<center>
# The Essential Guide to Ray.io’s Anatomy
<big>
**A Journey Through Ray's Capabilities in GPU Management and Scalable AI Development**
</big>
*Written by Angel Rey. Originally published 2024-04-29
on the [Monadical blog](https://monadical.com/blog.html).*
</center>
## Introduction
It can be challenging to choose the right framework when developing an application that involves GPU hardware and AI workloads. Our team faced this decision while building Morpheus, a self-hosted open-source AI image generator. Initially, we used Celery to run Morpheus, but we quickly discovered that it couldn't efficiently allocate GPU resources based on task requirements. So, we explored other frameworks and eventually switched to [Ray.io](https://www.ray.io), which was a game-changer for us.
With Ray's built-in functions, we could designate specific nodes for tasks like traffic management (CPU nodes) and inference processing (GPU nodes), as shown in the diagram below.
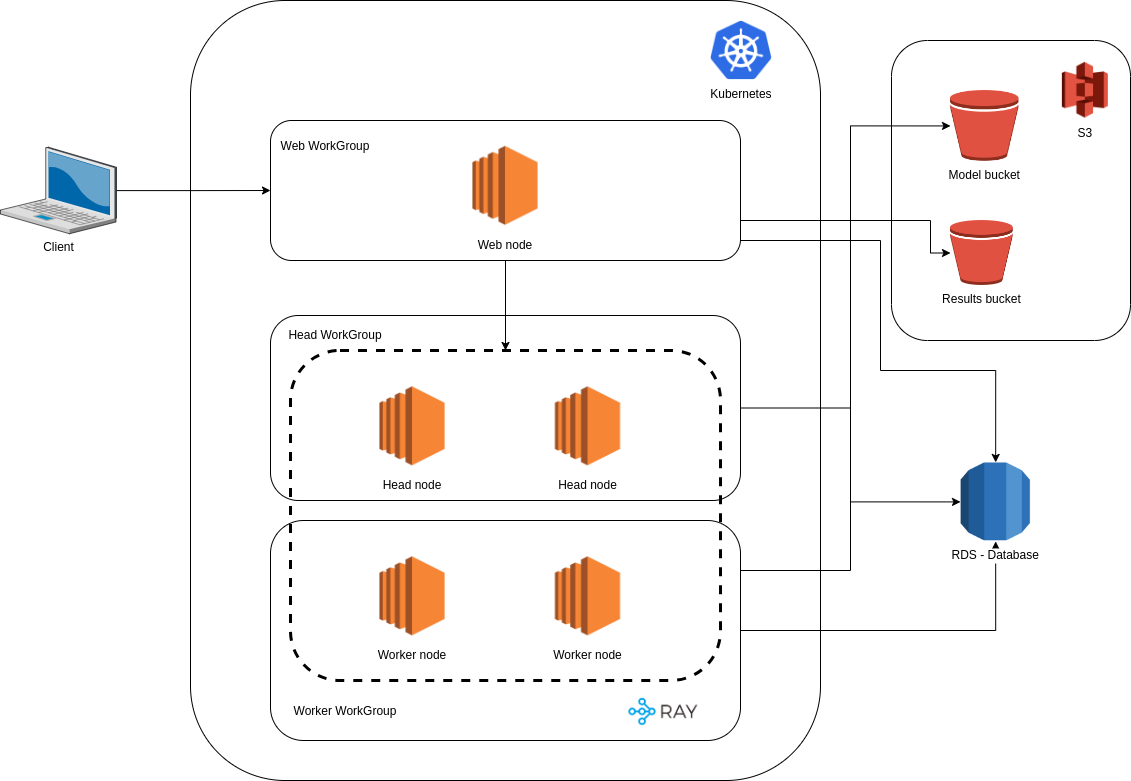
**<center>The architecture of Morpheus in AWS.</center>**
We then combined Ray with FastAPI to expose Morpheus as a set of inference endpoints. This strategic combination allowed us to distribute GPU tasks within the Ray cluster, solving our initial problem with GPU resource allocation.
If you're interested in the benefits of using Ray to build machine learning (ML) and general workloads, we've got you covered. This post will delve deeper into Ray's background, advantages, and use case examples. We'll also provide a guide to Ray's setup and three task examples. Let's begin our journey!
## Background and Advantages
### Background
Ray was initially designed to improve ML applications, specifically those that operate in a dynamic environment. The best model for this type of application is Reinforcement Learning (RL) [(Moritz et al., 2018)](https://arxiv.org/pdf/1712.05889.pdf).
The primary concept of RL applications involves training an agent to learn a policy by interacting with the environment and then choosing an action to execute based on that learning. The goal is for the agent to maximize its long-term rewards.
Therefore, we require these methods:
- **Simulation:** to find good policies exploring the different routes of action sequences
- **Training:** to improve those policies
- **Serve:** to provide solutions to problems serving the policies
### Advantages
The implementation of the methods above motivates Ray to create new system requirements such as:
- **Distributed tasks:** use multiple servers and add new servers to the group (cluster)
- **Fine-grained computations:** run small tasks with low latency
- **Heterogeneity:** reduce time running tasks and resources (GPU resources for training and CPU resources for simulations)
- **Dynamic computation:** handles millions of heterogeneous tasks with low latencies
These requirements point to Ray’s edge over other technologies because with Ray, you can achieve better:
- **Scalability:** Ray can parallelly scale stateful task executions. For instance, when implementing a parameter server, Ray can distribute worker nodes to maintain stateful task executions such as a model's globally shared parameters (a neural network), data, and computation of calculating updates. Ray also allows you to take advantage of the different resources available in a cluster. https://docs.ray.io/en/latest/ray-core/examples/plot_parameter_server.html.
- **Efficiency:** Ray allows for fractional allocation of GPU resources, allowing tasks to use only the necessary resources. Conversely, Celery does not allow for fractional resource use, making it less efficient than Ray.
- **Simplicity:** Ray is a Python-first framework, which is convenient since most ML is done in Python. Ray also supports interactive development, making debugging and testing your code easy and flattening the learning curve for developers.
- **Specialization:** Ray has developed specific libraries for their official use cases. Instead of replacing existing libraries, Ray tries to use and integrate them into its ecosystem. For instance, with the Run library, you can experiment with hyperparameter tuning using any ML framework like PyTorch, Xgboost, and TensorFlow.
- **Unification:** Spotify used Ray to unify their end-to-end ML workflows, from data preprocessing to model serving. They focused on accessibility, flexibility, availability, and performance when using Ray and Kubernetes in GCP. Using a graph learning approach for content recommendations, they created a graph from their data warehouse using Ray datasets, transformed the data using Ray preprocessors, trained the model using the distributed training feature, and implemented predictors using batch inferences.
## Use-Cases
If you still need convincing to switch to Ray, let's examine how three features fit into one salient example:
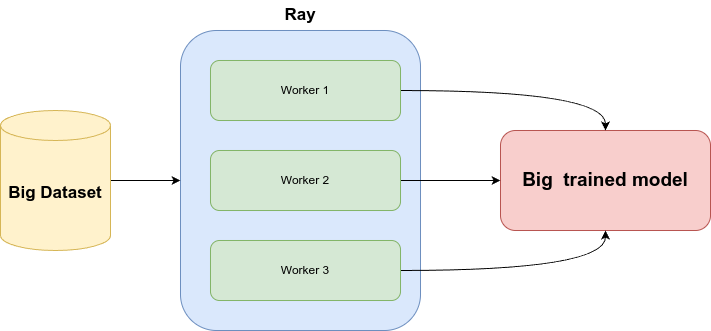
**1. Train the model:** If the dataset is massive and needs to be processed in multiple machines, we can train the model ([Ray Train](https://docs.ray.io/en/latest/train/train.html)) using distributed training.
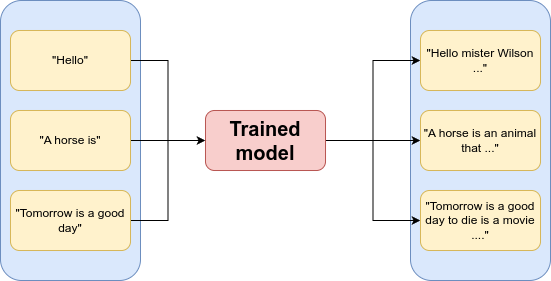
**2. Serve the trained model:** After training, we can develop an inference API (using [Ray Serve](https://docs.ray.io/en/latest/serve/index.html)), which exposes various functionalities, such as a batch inference endpoint.

**3. Generate inferences:** This batch inference endpoint can receive a list of text formatted in JSON and provide inferences associated with them.
And there you have it! Combining the use cases above will allow you to build an ML application that can serve any model.
## Basic Setup and Usage
Getting Ray up and running is straightforward, whether installing it on your machine or cloud platform. Next, we’ll look at how to install Ray on your machine using a virtual environment; this way, you can isolate your Python environment and dependencies from other projects. While several virtual environment tools exist, we use `virtualenv` for our guide.
To install Ray using `virtualenv`, follow these steps:
1. Create a virtual environment using `virtualenv`:
```sh
python3 -m virtualenv .venv
```
2. Activate the virtual environment:
```sh
source .venv/bin/activate
```
3. Install Ray:
```sh
pip install -U "ray[default]"
```
### Concepts
Diving into Ray requires getting familiar with a few foundational concepts. While they might appear similar at first glance, each plays a unique and critical role within the Ray ecosystem.
- **Worker:** a worker is a process that executes tasks submitted to the Ray cluster. It essentially carries out the computations you define in your Ray application. Workers reside on machines (nodes) within your Ray cluster. Typically, by default, Ray launches one worker per CPU core on each node. Workers communicate with each other, and the head node manages the cluster to receive tasks, share data (objects), and coordinate their work.
* **Task:** A task is a unit of work that a worker process can execute. It can be anything from simple calculations to complex machine-learning algorithms. It can run in parallel and is typically part of a larger computation. Tasks are submitted to the Ray cluster for execution; the system performs calculations or operations. See more at: https://docs.ray.io/en/latest/ray-core/tasks.html#ray-remote-functions.
* **Job:** A job is a collection of tasks related to accomplishing a specific computational goal. The big-picture view covers tasks working together to achieve an objective. A job might involve multiple tasks running concurrently or sequentially to solve a problem or perform a complex computation. See more at: https://docs.ray.io/en/latest/cluster/running-applications/job-submission/index.html.
* **Actor:** Actors can store data and methods, allowing multiple tasks to interact with them simultaneously. Actors are useful for scenarios needing persistent state or shared resources across various tasks. See more at: https://docs.ray.io/en/latest/ray-core/actors.html#actor-guide.
- **Objects:** Ray objects provide a powerful mechanism for managing states in distributed applications. Objects can be created and used by both tasks and actors, and they have a distributed nature, as they exist across a cluster of machines. The created objects can be accessed using object references, which act as unique IDs or pointers to the object. Remote objects are cached in Ray’s distributed shared-memory object store, with one object store per node in the cluster. See more at: https://docs.ray.io/en/latest/ray-core/objects.html#objects-in-ray.
Grasping these distinctions is critical to using Ray and distributing computing within its framework. With this knowledge, you can build efficient, scalable, and sophisticated systems with Ray.
### Basic Use
Ray's setup is straightforward. Start by importing the library in a Python file. The primary use is to run tasks synced using the available resources. Ray defaults to utilizing the CPU for task execution, simplifying the initial setup process.
The next step is to define a function with the `@ray.remote` decorator. This step signals to Ray that the function is intended for remote execution across its network, efficiently utilizing available resources.
Consider deploying a simple `hello_world` as follows:
```python
hello_world.remote()
```
To get the result of the function, use `ray.get()`. This function is necessary for accessing the results of your distributed tasks.
Upon completion, the script will show the result. It also allows for assigning the result to a variable if desired.
```python
# ray-basic/src/script.py
import ray
@ray.remote
def hello_world():
print("I'm working right now")
return "hello world"
# Automatically connect to the running Ray cluster.
ray.init()
print(ray.get(hello_world.remote()))
```
Another way to use Ray is to implement nested functions. You can call a remote function from within another, effectively setting up a multi-layered approach to task execution. The beauty of this setup lies in its ability to distribute tasks across different nodes, each potentially equipped with diverse resources like GPUs or specialized hardware.
Consider this: `main_function` initiates a call to `second_function` remotely. Should `second_function` land on a node already busy, `main_function` exhibits patience, awaiting `second_function`'s completion.
```python
# ray-basic/src/nested.py
import ray
import time
@ray.remote
def main_function():
print("Main function is going to sleep")
time.sleep(30)
print("I'm ready")
result = ray.get(second_function.remote())
return result
@ray.remote
def second_function():
print("Second function is going to sleep")
time.sleep(30)
print("Second function is ready")
return "second result"
# Automatically connect to the running Ray cluster.
ray.init()
print(ray.get(main_function.remote()))
```
Ray chains multiple tasks and syncs them until they’ve all finished their execution.
```python
# ray-basic/src/parameter.py
import ray
@ray.remote
def first_name():
return "Lucas"
@ray.remote
def last_name():
return "Fernandez"
@ray.remote
def complete_name(name, lastname):
return f"{name} {lastname}"
first_name_ref = first_name.remote()
last_name_ref = last_name.remote()
# You can pass an object ref as an argument to another Ray task.
complete_name_result = complete_name.remote(first_name_ref, last_name_ref)
assert ray.get(complete_name_result) == "Lucas Fernandez"
```
In this case, the `complete_name` function is designed to piece together a full name from two separate tasks: `first_name` and `last_name`. These tasks are executed remotely, and their results serve as inputs for `complete_name`. Later, we can use [ray.get](https://docs.ray.io/en/latest/ray-core/api/doc/ray.get.html) to collect the results of all the nested tasks.
## Beyond the Basics
Now that we’ve set up Ray's basic configuration, we can progress to more advanced tasks. In this section, we will explore creating a Ray cluster, scaling a Ray cluster, and deploying ML models with Ray Serve.
### Creating a Ray Cluster Using Docker
Docker creates and runs isolated containers containing everything needed to run your applications. It is excellent for setting up Ray clusters and streamlining the process of specifying each node's dependencies, resources, and configurations.
To start with Docker for your Ray cluster, you’ll need a Docker image containing all the required dependencies for Ray. The example below goes through what setting up a solid Ray Docker image entails.
```dockerfile
# ray-core/Dockerfile
FROM rayproject/ray:latest-gpu
# Configuration defaults
ENV VENV_NAME ".venv-docker"
# Setup system environment variables neded for python to run smoothly
ENV LC_ALL C.UTF-8
ENV LANG C.UTF-8
ENV PYTHONDONTWRITEBYTECODE 1
ENV PYTHONUNBUFFERED 1
# Install system requirements
RUN sudo apt-get update && sudo apt-get install -y jq build-essential libpq-dev && sudo rm -rf /var/lib/apt/lists/*
# Install & use pipenv
RUN pip install --upgrade pip pipenv
COPY requirements.txt .
RUN pip install -r requirements.txt
COPY ./bin/start.sh .
```
First, it installs the operating system dependencies and then installs the Python dependencies. In this case, the only dependency is the `ray[“default”]` package, which includes the core Ray functionalities and libraries.
We will need at least two services to define the Docker-compose file: the head Ray node and the worker. The main difference between both services is the default command, which tailors each node's role within the cluster. For the head node, it should be:
```bash
#!/bin/bash
ray start --head --num-gpus=0 --dashboard-host 0.0.0.0 --block --resources="{\"$1\":$2}"
```
When configuring the head node in your Docker-compose setup for a Ray cluster, several flags play pivotal roles in defining its behaviour and capabilities:
🏁 The `--head` flag tells Ray that this node will be the head node of the cluster, so it orchestrates the rest of the nodes.
🏁 The `--num-gpus=0` flag tells Ray that this node doesn’t have any GPUs available.
🏁 The `--dashboard-host 0.0.0.0` flag tells Ray that this cluster will have the Ray dashboard available.
🏁 The `--block` flag tells Ray that this command will keep running during the container execution.
🏁 The `--resources` flag is a way to define custom resources, such as specific hardware devices.
For the worker nodes in your `docker-compose` Ray cluster, the setup focuses on their role as task executors. A key command for initializing a worker node looks like this:
```bash
ray start --num-gpus=5 --address='worker-ray:6379' --block
```
The critical part here is the flag `--num-gpus=5`, which tells Ray that this node has 5 GPUs available for the tasks. The `--address` flag tells the worker node where to find the head node.
Finally, our `docker-compose.yml` should look like this:
```yaml
# ray-core/docker-compose.yml
version: "3.3"
services:
worker-ray:
build: .
image: morpheus-worker-core-local:latest
command: bash start.sh "rtx3080" 3
volumes:
- ./src:/mnt
ports:
- "8000:8000"
- "8265:8265"
worker-ray-worker:
image: morpheus-worker-core-local:latest
command: ray start --num-gpus=5 --address='worker-ray:6379' --block
depends_on:
worker-ray:
condition: service_started
```
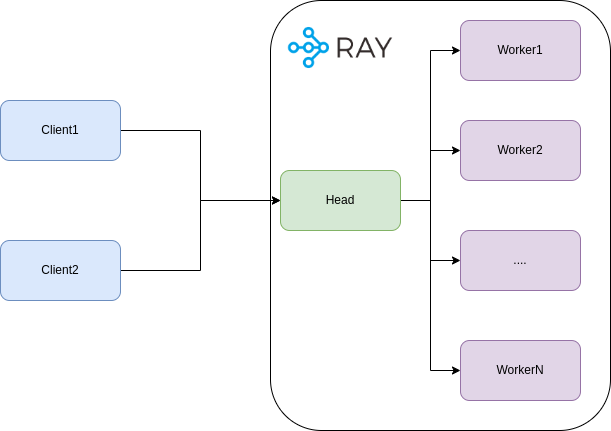
**<center>The architecture of a Ray Cluster.</center>**
Let’s take a closer look at a few examples.
**Example 1:**
When it comes time to use the cluster, one approach involves dispatching a job for execution across the cluster's nodes. This is achieved through the `JobSubmissionClient` class, a handy Python API designed for submitting jobs to a Ray cluster.
The method `submit_job` requires at least two parameters to get the ball rolling:
- **entrypoint:** This is the command to execute the job. In this case, it’s `python resources.py`, which runs a Python script called `resources.py`.
- **runtime_env:** This is where you tailor the execution environment to your needs. In this example, it overrides the directory that contains the `resources.py` script.
```python
# ray-core/src/client.py
from ray.job_submission import JobSubmissionClient
# If using a remote cluster, replace 127.0.0.1 with the head node's IP address.
client = JobSubmissionClient("http://127.0.0.1:8265")
job_id = client.submit_job(
# Entrypoint shell command to execute
entrypoint="python resources.py",
# Path to the local directory that contains the script.py file
runtime_env={"working_dir": "/mnt"}
)
print(job_id)
```
The resource script is straightforward and primarily exists to display a message. However, the spotlight falls on the `ray.remote(num_gpus=2)` decorator, meaning the function will need at least two GPUs. Should Ray find its GPU resources lacking and unable to meet the requirements, it will remain a pending job.
```python
# ray-core/src/resources.py
import ray
@ray.remote(num_gpus=2)
def hello_world():
print("I'm working right now")
return "hello world"
# Automatically connect to the running Ray cluster.
ray.init()
print(ray.get(hello_world.remote()))
```
**Example 2:**
In the following example, we use the same entrypoint as before, but the script's name is `time.py` this time.
```python
# ray-core/src/client2.py
from ray.job_submission import JobSubmissionClient
# If using a remote cluster, replace 127.0.0.1 with the head node's IP address.
client = JobSubmissionClient("http://127.0.0.1:8265")
job_id = client.submit_job(
# Entrypoint shell command to execute
entrypoint="python time.py",
# Path to the local directory that contains the script.py file
runtime_env={"working_dir": "/mnt"}
)
print(job_id)
```
Much like the previous example, `time.py` unfurls with a simple function —its primary aim is to convey a message. You'll find that delays can commonly creep in, stretching the wait times to longer than anticipated. This isn't unusual within the realm of ML tasks.
```python
# ray-core/src/time.py
import ray
import time
@ray.remote(num_gpus=2)
def hello_world():
print("I'm going to sleep")
time.sleep(30)
print("I'm ready")
return "hello world"
# Automatically connect to the running Ray cluster.
ray.init()
print(ray.get(hello_world.remote()))
```
**Example 3:**
In our third and final example, we’ll take a slightly different tack by sending some parameters to the job using env variables as our thread. To do this, we’ll use the `runtime_env` parameter in `submit_job`, and the `env_vars` key within the dictionary provided. For this example, use `MY_ENV_VALUE`.
```python
# ray-core/src/client3.py
from ray.job_submission import JobSubmissionClient
# If using a remote cluster, replace 127.0.0.1 with the head node's IP address.
client = JobSubmissionClient("http://127.0.0.1:8265")
job_id = client.submit_job(
# Entrypoint shell command to execute
entrypoint="python env_vars.py",
runtime_env={"working_dir": "/mnt", "env_vars": {"MY_ENV_VALUE": "This is an example"}}
)
print(job_id)
```
Subsequently, the environment variable can be accessed within the `env.py` script using the `os.environ` method.
```python
# ray-core/src/env_vars.py
import ray
import time
import os
@ray.remote(num_gpus=2)
def hello_world(value):
print(f"This is the env var: {value}")
time.sleep(30)
print("I'm ready")
return "hello world"
# Automatically connect to the running Ray cluster.
ray.init()
ray.get(hello_world.remote(os.environ.get("MY_ENV_VALUE")))
```
### Scaling the Cluster
Scaling a Ray cluster consists of adding a service similar to the initial worker and connecting it to the head node. This process entails specifying a new worker in your configuration.
However, it's crucial to be mindful when specifying resources, such as declaring that a worker has five GPUs (see below). While Ray operates based on your allocated resources, it relies on accurate information. Ray manages resources logically and won't verify the physical existence of those GPUs, so making sure the hardware matches your specifications falls under your responsibility as the developer. It’s important to note that this example defines a GPU number of 5, which is not a real value.
```python
worker-ray-worker-2:
image: morpheus-worker-core-local:latest
command: ray start --num-gpus=5 --address='worker-ray:6379' --block
depends_on:
worker-ray:
condition: service_started
```
### Serving Your ML Models with Ray Serve
Ray Serve is the easiest way to deploy a Ray project as a web application. Ray Serve streamlines the deployment of online inference APIs, offering the flexibility to handle dynamic requests and scale automatically.
To run an application with Ray Serve, use this command:
```bash
serve run module_name:deployment_variable –host 0.0.0.0
```
This command tells Ray Serve to run a module and a deployment variable, making your application accessible from the host machine.
```bash
serve run module_name:deployment_variable –host 0.0.0.0
```
This command tells Ray Serve to run a module and a deployment variable, making your application accessible from the host machine.
```yaml
# ray-serve/docker-compose.yml
version: "3.3"
services:
serve:
build: .
image: morpheus-serve:latest
command: serve run models:deployment --host 0.0.0.0
volumes:
- ./models:/mnt/
ports:
- "8000:8000"
- "8265:8265"
deploy:
resources:
reservations:
devices:
- driver: nvidia
count: 1
capabilities: [ gpu ]
```
The implementation is quite simple. You can implement any remote function you need using the `ray.remote` decorator, which allows you to specify the necessary resources for each function. For instance, in this case, we have a function designed to generate an image with a Stable Diffusion model; here, the decorator indicates that this function requires a single GPU to operate.
```python
# ray-serve/models.py
import ray
import torch
import io
from diffusers import StableDiffusionPipeline, DPMSolverMultistepScheduler
from fastapi import FastAPI
from fastapi.responses import StreamingResponse
from ray.util.state import summarize_tasks
from ray import serve
app = FastAPI()
@ray.remote(num_gpus=1)
def image(prompt):
model_id = "/mnt/stable-diffusion-2-1"
pipe = StableDiffusionPipeline.from_pretrained(model_id, torch_dtype=torch.float16)
pipe.scheduler = DPMSolverMultistepScheduler.from_config(pipe.scheduler.config)
pipe.enable_attention_slicing()
pipe.enable_xformers_memory_efficient_attention()
pipe = pipe.to("cuda")
negative_prompt = "(((deformed))), (extra_limb), (long body :1.3), (mutated hands and fingers:1.5), (mutation poorly drawn :1.2), (poorly drawn hands), (ugly), Images cut out at the top, anatomical nonsense, bad anatomy, bad anatomy, bad breasts, bad composition, bad ears, bad hands, bad proportions, bad shadow, blurred, blurry, blurry imag, bottom, broken legs, cloned face, colorless, cropped, deformed, deformed body feature, dehydrated, disappearing arms, disappearing calf, disappearing legs, disappearing thigh, disfigure, disfigured, duplicate, error, extra arms, extra breasts, extra ears, extra fingers, extra legs, extra limbs, fused ears, fused fingers, fused hand, gross proportions, heavy breasts, heavy ears, left, liquid body, liquid breasts, liquid ears, liquid tongue, long neck, low quality, low res, low resolution, lowers, malformed, malformed hands, malformed limbs, messy drawing, missing arms, missing breasts, missing ears, missing hand, missing legs, morbid, mutated, mutated body part, mutated hands, mutation, mutilated, old photo, out of frame, oversaturate, poor facial detail, poorly Rendered fac, poorly drawn fac, poorly drawn face, poorly drawn hand, poorly drawn hands, poorly rendered hand, right, signature, text font ui, too many fingers, ugly, uncoordinated body, unnatural body, username, watermark, worst quality"
r_image = pipe(
prompt,
width=768,
height=768,
num_inference_steps=50,
negative_prompt=negative_prompt
).images[0]
return r_image
```
You also need to implement an `APIIngress`, a class that defines the routes and methods for your web application. In this case, by leveraging FastAPI, we can define a method called `imagine`, which maps to the route `/imagine`. This method can call the remote image function and return the image as a response.
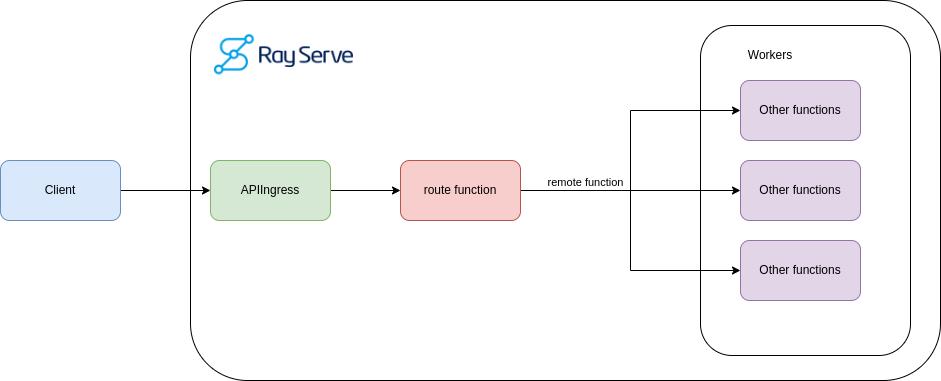
**<center>Ray Serve application example.</center>**
Finally, you need to use the `serve.deployment` decorator to register your `APIIngress` class as a deployment. This decorator lets you specify the number of replicas Ray Serve will create to manage the incoming traffic. If the deployment requires a specific resource type, you can define it there.
```python
# ray-serve/models.py
@serve.deployment(num_replicas=5, route_prefix="/")
@serve.ingress(app)
class APIIngress:
def __init__(self) -> None:
print("Initializing")
self.task_types = [
"PENDING_OBJ_STORE_MEM_AVAIL",
"PENDING_NODE_ASSIGNMENT",
"SUBMITTED_TO_WORKER",
"PENDING_ARGS_FETCH",
"SUBMITTED_TO_WORKER"
]
@app.get("/imagine")
async def generate(self, prompt: str, img_size: int = 512):
assert len(prompt), "prompt parameter cannot be empty"
future = image.remote(prompt)
result = ray.get(future)
buf = io.BytesIO()
result.save(buf, format='JPEG', quality=100)
buf.seek(0) # important here!
return StreamingResponse(buf, media_type="image/jpeg")
deployment = APIIngress.bind()
```
It’s essential to understand that the remote function enables the application to scale because it depends on the resource and node availability. Ray Serve will automatically distribute the requests to the available replicas and nodes and scale up or down as needed.
## Conclusion
In this post, we covered all things Ray, including its advantages, use cases, basic setup and usage, and how to use this framework beyond basic examples.
With this knowledge, we hope you use Ray to build and scale your next ML and AI project. For more information on the [Ray community](https://discuss.ray.io/), check out its wealth of resources and [tutorials](https://docs.ray.io/en/latest/index.html). Please take the time to explore and share in the comments whether you use Ray or another framework when building ML and AI applications.
## References
Moritz, Philipp, et al. "Ray: A Distributed Framework for Emerging AI Application." arXiv, 11 Dec. 2017, arXiv:1712.05889. https://arxiv.org/abs/1712.05889.


Published on 2024-04-29
Recent posts:
- The Essential Guide to Ray.io’s Anatomy
- Reflector: Elevate Communication with Our Real-Time Translation Tool
- Building a Ticketing System with Solana Mobile and Metaplex Foundation Umi
- Kraken the Code: How to Build a Talking Avatar
- View more posts...
Back to top